
How to Specify a Decorative Hollow Wood Beam That Fits the Building
First determine whether the member is structural or decorative, then document its sides, material, exterior dimensions, usable cavity and joints.
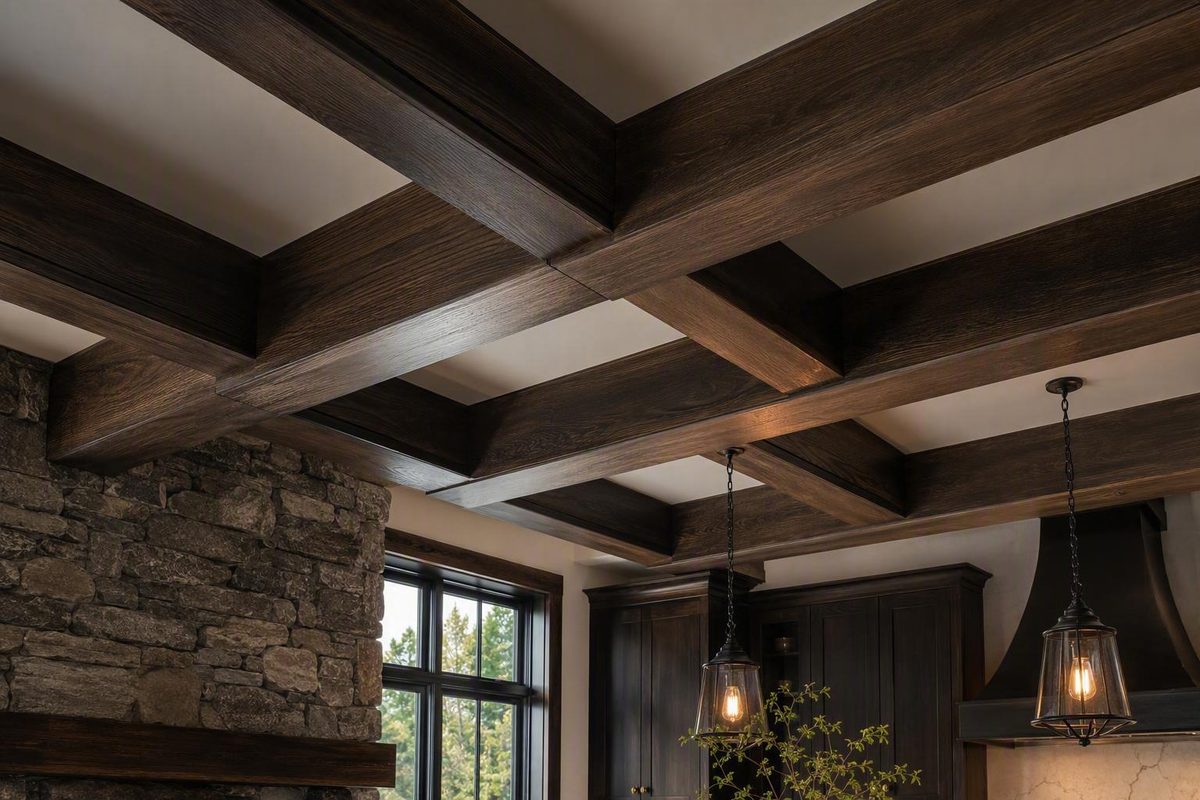
Decorative box beams can make a plain ceiling read as timber construction, wrap an awkward structural member, organize a coffered ceiling, or turn a post into an intentional architectural feature. Their hollow construction also creates usable space and reduces weight relative to comparably sized solid timber, but those advantages can encourage costly assumptions about structure, fit, attachment, and concealed services.
A successful box-beam project starts by separating appearance from structure. The designer, builder, installer, and supplier must then coordinate exterior dimensions, usable cavity size, visible sides, material, finish, joints, attachment, services, freight, and installation access. These decisions belong on the drawing, quote, or shop order—not in the hands of installers supporting a long finished shell overhead.
What “box beam” means—and what this guide covers
“Box beam” can describe several building elements. This guide covers a narrower category: decorative hollow wood box beams made to resemble solid timber.
A typical real-wood box beam is assembled from multiple boards around an empty core. Most ceiling versions have three finished sides and an open back. The opening fits over blocking, cleats, framing, or an existing member. Four-sided versions can enclose posts or serve locations where every face remains visible.
Most products documented here are decorative and non-load-bearing. H&H Lumber, for example, describes its box beams as hollow assemblies used for decoration or to wrap existing structural members and states that they do not replace structural framing in its comparison of box beams and solid timber.
A decorative shell may conceal:
- A laminated veneer lumber, or LVL, beam
- A glulam
- A steel beam
- A structural header
- An older timber
- A post or column
- Conventional framing or blocking
The hidden member continues to carry the building load. The wood shell supplies the intended proportion, texture, and finish; it does not acquire the concealed member’s structural capacity.
The term faux beam can also mislead. It sometimes means molded imitation wood, but sellers also use it for hollow assemblies made from genuine wood. In that context, “faux” describes the imitation of a solid timber’s mass, not necessarily the visible material.
If the visible member must support a roof, floor, wall, fixture, or another load, do not select it from decorative-product dimensions or installation instructions. Refer to the project’s structural drawings and obtain appropriate professional review. A large solid timber is not automatically suitable merely because it is heavy or substantial; its structural use must be established for the project.
The first question on every box-beam schedule should therefore be:
Is this member structural, a decorative shell, or a decorative shell wrapping an independently supported structural member?
Until that question is answered, dimensions, price, finish, and installation method are premature.
Box beams versus solid timber: choose by function, not appearance
A hollow shell and a solid timber can look similar after installation, but they solve different problems.
If an exposed member must carry a building load, it must be selected and detailed as part of the structural system. If it is decorative, the primary criteria shift toward proportion, weight, fit, cavity clearance, attachment, finish quality, and total installed cost.
Hollow construction generally weighs less than a comparably sized solid timber. That can simplify lifting and reduce the amount of mass introduced late in construction. A three-sided shell can also fit over prepared blocking or an existing member, allowing the final wood surface to be installed after rough structural work.
That does not make installation universally easy. Long finished shells remain cumbersome overhead. Pitched ceilings, inconsistent framing, fragile corners, narrow access routes, and joints between sections can turn an apparently simple trim package into demanding finish carpentry.
Fabrication also offers control over visible proportions. Exterior width and depth can be selected to suit the room even when solid timbers of that size are unavailable, excessively heavy, or visually inconsistent. A shell can conceal a structural member whose dimensions do not match the intended architectural rhythm.
Solid timber offers different advantages. It provides the full depth and end grain of one large section, and a properly specified timber may perform structural work. It also avoids fabricated corner joints. Those benefits come with constraints that can include substantial weight, limited available dimensions, difficult handling, and natural wood movement.
Solid timbers may check, shrink, twist, crack, or warp as their moisture condition changes. A box beam fabricated from selected boards and controlled joinery may reduce some visible movement risks, but it cannot eliminate wood’s response to changing conditions. Miters can open, individual boards can move, and reclaimed faces may begin with irregularities.
Hollow construction does not automatically mean a lower price. It uses less wood than a solid timber with the same exterior dimensions, but custom fabrication adds labor. Board matching, corner machining, distressing, custom finishes, end caps, long-section packing, freight, and overhead installation can all be substantial. One reclaimed-beam seller states that its custom box beams can cost more than solid beams because of the additional labor required to fabricate them.
| Decision factor | Decorative hollow box beam | Solid timber |
|---|---|---|
| Structural capacity | Normally decorative and not a replacement for framing | May be structural when selected and designed for the project |
| Weight | Generally lighter at comparable exterior dimensions | Usually heavier |
| Dimensional customization | Exterior proportions and cavity can be fabricated to suit the application | Constrained by available timber dimensions, species, grade, and condition |
| Movement risk | Fabrication may reduce some risks, but natural wood still moves | Large sections may check, shrink, twist, crack, or warp |
| Concealment capacity | Hollow core can wrap structure or accommodate coordinated services | No internal cavity |
| Installation | Commonly fits over blocking or an existing member; fit and overhead handling still require care | Heavy lifting and structural connections may require equipment and specialized labor |
| Price certainty | Project-specific; fabrication, finish, freight, and installation must be priced together | Also project-specific; material, engineering, handling, connections, and installation can be substantial |
The practical choice is not “real versus fake.” It is structural member versus architectural enclosure, followed by a comparison of weight, dimensions, movement, finish, access, and total installed cost.
Choose the right shape, material, texture, and finish
The installation condition determines the required number of sides.
A two-sided or L-shaped beam works at a corner, such as a wall-to-ceiling junction, where the building surfaces complete the enclosure.
A three-sided or U-shaped beam is the usual ceiling configuration. Its open back fits over blocking or an existing member while the bottom and two sides remain visible. The same form can wrap a projecting member on a wall.
A four-sided beam encloses all faces. It is useful around posts and columns, for horizontal elements visible from above and below, or where an exposed end would otherwise reveal the hollow core. It may arrive as a completed shell or as parts assembled around an element that cannot pass through a closed enclosure.
Exposed ends need intentional treatment. Options include a fitted end cap, a return into a wall, an intersection with another beam, or an open end placed out of view. Decide before ordering: an end cap affects length, grain matching, finish, assembly sequence, and cost.
Real-wood choices
Products represented in the available evidence include reclaimed lumber, eastern white pine, Douglas fir, cedar, white oak, walnut, alder, poplar, plywood, and MDF. Selection should address more than color.
- Reclaimed wood can present mortise pockets, nail holes, weathering, adze marks, and irregular faces. Age, provenance, moisture condition, treatment history, and pest status should not be inferred from appearance alone.
- Pine can support stained, painted, smooth, or textured work. Board selection matters because knots, bow, and grain variation affect corners and long runs.
- Douglas fir is represented in real-wood decorative products and can suit stronger-grained rustic or contemporary treatments.
- Cedar is available in smooth and distressed decorative beams.
- White oak is commonly offered for visible-grain contemporary work.
- Walnut provides a naturally darker palette and may require careful board matching.
- Paint-grade poplar, plywood, and MDF suit assemblies where a controlled painted surface matters more than exposed natural grain.
Stain-grade solid wood and paint-grade sheet goods solve different finish problems. Stain-grade work exposes grain variation, corner matching, repairs, and color differences. Paint-grade coffered ceilings can instead use plywood support assemblies with MDF faces to create consistent intersections and level visual planes. One documented trade method establishes level beam bottoms below a wavy ceiling rather than forcing every finished beam to follow the ceiling variation in a plywood-and-MDF coffered-ceiling assembly.
Texture terminology
Texture labels are useful starting points, not complete specifications.
- Smooth usually indicates a planed or sanded surface with limited relief.
- Hand-hewn generally shows tool-like or axe-like marks.
- Rough-sawn retains prominent saw kerfs and irregular milling texture.
- Resawn is generally smoother than rough-sawn but preserves visible saw marks.
These names are not standardized. One seller’s “smooth” description refers to a band-sawn face, while its circle-sawn description also repeats band-sawn language, illustrating why the label alone is inadequate as a finish specification.
Specify texture with a physical sample, an approved control photograph, and written notes describing the desired relief. Clarify whether fabrication will interrupt saw marks, whether all visible boards receive the same treatment, and whether distressing occurs before or after assembly.
Finish responsibility
Common delivery conditions include:
- Raw and unfinished
- Sanded but unsealed
- Factory stained
- Custom color matched
- Clear coated
- Primed or painted
- Prefinished faces with unfinished field joints
An unfinished beam provides flexibility for jobsite color matching but transfers responsibility for sanding, conditioning, stain testing, sealing, and touch-up to the project team.
Clarify who will finish end caps, field-cut ends, seam repairs, nail holes, caulked gaps, and damaged areas. A factory color approval does not automatically solve field touch-up unless compatible materials and procedures are included.
Review samples in the installation room. This is especially important for a custom order that may be final sale.
Measure the exterior, the cavity, and the room
A box beam has at least two dimensional envelopes:
- The exterior width and depth, which establish visual proportion.
- The usable interior width and depth, which determine what the beam can cover.
Do not derive one from the other.
A beam that appears large enough on an elevation may fail to fit around steel, glulam, LVL, framing, or coordinated services. Conversely, increasing the cavity can make the exterior beam wider or deeper than the room can support visually.
Nominal labels are especially risky. One reclaimed product lists a nominal 4-by-8 beam with exterior dimensions of approximately 3½ to 4 inches by 7 to 8 inches, but an interior opening of only about 1½ to 2 inches by 4½ to 5 inches for that specific product. Those dimensions should not be transferred to another beam; they demonstrate why exact exterior and interior measurements must be requested.
Pre-order measurement checklist
Record and verify:
- Overall room length and width
- Number of beams
- Centerlines and spacing
- Desired exterior width and depth
- Minimum usable interior width and depth
- Number of visible sides
- Finished ceiling height
- Ceiling pitch or vault angle
- Wall and ceiling irregularities
- Concealed-member dimensions at several locations
- Beam-end conditions
- Intersections with walls, beams, trim, or cabinetry
- Proposed service penetrations
- Detectors, diffusers, grilles, lights, sprinklers, and other obstacles
- Doorways, stairs, elevators, corridors, and turns along the access route
- Maximum manageable delivery and installation length
- Preferred joint locations
- Available framing or attachment substrate
- Space required for cleats, blocking, fasteners, and assembly movement
Measure long runs and concealed elements at multiple points. Existing framing can taper, walls can bow, and ceilings may not be level, square, or consistent. Plates, bolt heads, hangers, repairs, or applied finishes can create local projections larger than the apparent member size.
Mounting supports also consume cavity space. A manufacturer may size blocks slightly below its product’s internal dimensions to permit fitting, but that is a product-specific detail, not a universal tolerance. Obtain the current instructions for the selected system.
For pitched ceilings, measure and transfer the actual installation angle. Do not casually infer the finished cut from nominal roof geometry. The relationship between the ceiling plane, beam face, framing, and finish can affect the required bevel.
An uneven ceiling presents several design choices:
- Let the beam follow the ceiling and accept a nonlevel bottom.
- Scribe the beam sides to the ceiling.
- Conceal limited gaps with molding.
- Establish a level plane for the beam bottoms and absorb variation above.
- Combine leveling, selective scribing, and trim.
The correct approach depends on the design intent, ceiling variation, beam depth, finish, and acceptable shadow lines. Natural wood with a minimal profile may favor careful scribing; a painted coffered system may accommodate molding more readily.
Before fabrication, require dimensioned shop drawings or a written quote that identifies:
- Exterior width and depth
- Minimum clear interior opening
- Overall and section lengths
- Number of sides
- Open and capped ends
- Joint type and location
- Face and grain orientation
- Texture and finish
- Assembly condition at delivery
- Cleat or blocking assumptions
- Required installation clearance
- Approved tolerances
- Field-cut and touch-up responsibility
A rendered room view communicates design intent. It is not a fabrication document. The shop order needs dimensions that the estimator, fabricator, and installer interpret the same way.
Plan long runs, joints, and visual continuity
Room length is not the only factor controlling beam length. Available lumber, fabrication equipment, board quality, freight restrictions, building access, turning radius, installation height, crew capability, and handling conditions all affect the practical section length.
Published capabilities vary and should be treated as vendor-specific examples. The Vintage Wood Floor Company reports having produced a one-piece box beam up to 40 feet within its own product line.
Reclaimed Wood Source offers custom lengths from 14 feet to more than 50 feet, while noting that lengths over 16 feet may use two beams connected by a lap joint for that product.
H&H Lumber reports making individual finger-jointed box beams longer than 20 feet as a company-specific capability. None of these figures is an industry-wide maximum.
Long-run strategies include:
- A one-piece fabricated shell
- Multiple sections installed end to end
- Lap joints
- Finger-jointed material
- Scarf joints
- Mitered seams
- Flat-packed components assembled on site
- Intersections that conceal shorter section ends
A one-piece beam can reduce field seams, but it can also require specialized freight, a larger unloading area, more installers, lifting equipment, broader access, and extra protection against bending or corner damage. A section that can be fabricated may still be impossible to move through the building.
Flat-packed products reverse part of that tradeoff. Separate boards can be easier to ship and carry, while field assembly adds labor, alignment risk, tool requirements, and finish work. Preassembled beams centralize fabrication quality but increase shipping volume and handling difficulty. Neither format is inherently superior.
Place unavoidable joints deliberately. Consider:
- Main-entry and seated sightlines
- Daylight and grazing electric light
- Beam intersections
- Grain direction and continuity
- Repeating joint rhythms
- Fastening and backing access
- Locations where texture can visually absorb a seam
- Whether the finish should conceal or express the transition
A seam above cabinetry, at a crossing beam, or in a low-contrast part of the room may be less conspicuous than one beneath a strong downlight. Irregular reclaimed texture may help integrate a seam, but mismatched color or relief can make it more visible.
DIY accounts show that short dimensional boards can be joined into longer decorative shells. One pitched-ceiling project used mitered seams because available boards were shorter than its approximately 17-foot runs; the author reported $740 for three alder beams in that individual project. Another documented project used scarf joints. These examples demonstrate possible carpentry approaches, not engineering details or universal finish standards.
Use this sequence for every long run:
- Verify the full access route from truck to final ceiling location.
- Establish the maximum manageable section length for the actual room and installation team.
- Select the joint or assembly method appropriate to the product and finish.
- Approve seam locations on reflected ceiling plans or shop drawings.
- Coordinate blocking and fastening access at each section end and joint.
- Confirm the finish strategy, including grain matching, filler, caulk, stain, trim, or intentional joint expression.
The best seam is not necessarily no seam. It is the transition that can be delivered, supported, installed, and finished predictably.
How decorative box beams are mounted
Most decorative installations follow the same broad principle: sound framing supports cleats, blocks, or dimensional lumber; the hollow shell is dry-fitted over that support; and the shell is attached according to its construction and current product instructions.
That principle is not a universal fastening schedule. Shell material, thickness, weight, substrate, framing direction, ceiling condition, and installation geometry vary. The evidence reviewed for this guide does not establish generally applicable fastener types, spacing, embedment, adhesive requirements, or allowable loads.
A practical planning sequence is:
- Confirm the reflected ceiling layout and beam centerlines.
- Locate and verify framing rather than relying only on finish-surface marks.
- Check ceiling flatness, pitch, intersections, and obstacles.
- Coordinate proposed concealed services and future access.
- Install cleats or blocking using a method appropriate to the selected system and verified substrate.
- Check support alignment and cavity clearance.
- Dry-fit each shell before permanent attachment.
- Adjust cuts, scribes, joints, and end conditions.
- Attach the beam using the product-specific method.
- Complete seams, holes, gaps, and finish touch-ups.
Dry fitting can expose conflicts with walls, hardware, framing variation, or section joints before permanent fasteners or adhesive complicate removal. The shell should fit as intended by its manufacturer without being forced into place.
Lower weight does not remove the need to verify the attachment substrate or plan safe overhead handling. Manufacturer guidance for one faux-beam system specifically calls for a second person during installation, but its mounting-block and fastening details remain specific to that product rather than universal requirements for real-wood box beams.
Flat ceilings are generally simpler because blocking, beam sides, and cuts can remain orthogonal. Pitched and vaulted ceilings introduce angle transfer, bevels, variable gaps, and more difficult support geometry. Irregular walls add another plane that may require scribing.
DIY projects document U-shaped, three-board shells installed over ceiling-mounted 2-by-4 or 2-by-6 supports. They are useful illustrations of the assembly concept, but they do not establish approved fastener sizes, spacing, substrate capacity, or code compliance for another installation.
Prefinishing visible faces before installation can reduce overhead sanding and staining and may help protect adjoining finishes. The project still needs a plan for field-cut ends, nail holes, seam repairs, caulk, and color correction.
Possible finish treatments include:
- Compatible filler at nail holes
- Caulk at paint-grade wall and ceiling gaps
- Molding along limited ceiling irregularities
- Scribed side boards
- Routed beads or quirks that control the visual line
- Carefully fitted scarf, miter, or lap seams
- Grain-matched repairs and touch-up stain
Paint-grade coffered assemblies can use plywood blocking and MDF faces to create consistent planes and painted intersections. Machining MDF produces fine dust; the documented trade method identifies inhalation as a concern and uses dust collection and a respirator while milling the MDF components.
Use the current installation manual for the selected beam. Obtain project-specific review when the shell is unusually heavy, framing is poorly aligned, the substrate is uncertain, the ceiling is substantially irregular, or the proposed attachment cannot be verified. The sources reviewed here do not provide a universal engineered or code-compliant mounting detail.
Concealing structure and services without creating a new problem
The hollow core is useful for wrapping structural members and coordinating selected building services. Documented product applications include concealing LVLs, glulam, steel, older beams, headers, posts, columns, framing, wiring conduits, plumbing, ductwork, and some lighting components.
That list describes possible concealment uses, not technical approval for a specific installation. The decorative shell does not become structural support for the member or service it surrounds.
At the first coordination meeting, identify:
- Actual usable cavity dimensions
- Space occupied by cleats and fasteners
- Beam and service joints
- Proposed access points
- Heat or moisture concerns requiring trade review
- Connections, controls, or components that may need inspection
- Independently supported service routes
- A future removal or replacement strategy
The available decorative-beam evidence does not establish electrical, mechanical, plumbing, fire-protection, flame-spread, heat-clearance, condensation, or inspection requirements. It therefore cannot determine whether a junction box, light, duct, pipe, sprinkler, or other component may be enclosed in a particular project.
Treat the cavity as a coordination zone, not automatically available service space. Before fabrication, have the responsible trade and applicable project authority determine whether the proposed arrangement is permitted, what clearances or access are required, and whether the enclosure material is suitable.
Fans, chandeliers, televisions, shelves, and other applied loads should not be assumed to hang from a decorative shell. A commercial installation guide addressing fans and chandeliers calls for additional mounting measures rather than relying on the basic decorative-beam installation alone. The load path must be independently verified for the project.
Direct unresolved questions to the appropriate party:
- Structural professional: building loads, modifications to structural members, or applied fixtures
- Carpenter or installer: framing location, blocking, fit, joints, and attachment execution
- Electrician: wiring, boxes, lighting, fans, and electrical access
- HVAC contractor: ducts, grilles, heat, condensation, and serviceability
- Plumber: piping, valves, cleanouts, drainage, and leak access
- Fire-protection professional: sprinkler coordination, coverage, and system access
Where future inspection or repair may be necessary, incorporate an access strategy before fabrication. Possible design responses include removable end caps, independently fastened short sections, concealed panels, demountable trim, or strategically located joints. The responsible trade must determine whether the proposed access is adequate.
A beam that conceals a service but prevents required maintenance has not solved the building problem; it has moved it behind finished millwork.
Build a realistic budget and procurement schedule
A useful box-beam budget is a total installed-cost estimate, not the amount displayed beside a product photograph.
Include:
- Material and species
- Exterior dimensions
- Usable cavity dimensions
- Overall length and number of sections
- Number of sides
- End caps and exposed-end treatments
- Texture and distressing
- Stain, clear coat, primer, or paint
- Custom color development
- Fabrication and board matching
- Joints and grain continuity
- Samples and mockups
- Cleats, blocking, fasteners, and compatible adhesives
- Waste and touch-up material
- Packing and crating
- Parcel, local delivery, or LTL freight
- Unloading and storage
- Lifts, scaffolds, or other equipment
- Installation labor
- Filling, caulking, staining, and paint touch-up
Online prices are difficult to compare because the purchasing unit may vary. A displayed amount can represent a starting price, material sample, deposit, one configuration, or an unexplained catalog figure rather than a completed custom beam.
As published examples, HoneySuckle Builds lists $164.82–$1,020.70 for its smooth and band-sawn pine beams and $220.17–$1,076.05 for circle-sawn beams. It also identifies the products as made to order and describes freight for destinations outside its local delivery area on its box-beam page.
Barron Designs separately lists cedar-beam starting prices of $337 for smooth, $408 for heavy hand-hewn, $337 for wire-brushed, and $367 for barn-board styles before project-specific selections.
Those figures and the previously cited $740 DIY alder project are vendor- or project-specific. They are not market averages, installed prices per linear foot, or reliable comparisons without matching dimensions, construction, finish, freight, and labor.
Cost propositions can conflict because project conditions differ. Hollow beams may reduce material volume, weight, or lifting demands in some applications. Custom real-wood shells may still cost more than solid products because they require skilled fabrication, board matching, finishing, protective packing, and installation. Both statements can be true.
Lead times also vary by product. HoneySuckle Builds states five to seven business days for its made-to-order pine products, although its broader fulfillment information is not fully consistent with every product statement. Reclaimed Wood Source gives approximately eight to ten weeks for its reclaimed beam product. These are seller-specific production examples, not an industry schedule.
Another white-oak seller states that most orders ship within four to six weeks after final color approval, meaning the approval period precedes the quoted production window; it also states that custom orders are final sale for that product line.
A realistic schedule includes:
- Field measurement
- Design and preliminary pricing
- Sample ordering
- Color and texture approval
- Shop-drawing review
- Final dimension release
- Fabrication
- Packing and freight booking
- Transit
- Site receipt and damage review
- Supplier-required storage or acclimation
- Installation
- Final finishing and touch-up
Some published lead times begin only after dimensions, color, or shop details are approved. Delayed approvals therefore move production even if the stated fabrication period remains unchanged.
Long beams may require less-than-truckload freight, a custom shipping quote, local delivery, or dedicated transport. Confirm who arranges unloading, what equipment is required, where the package will be stored, and whether the delivery vehicle can reach the site.
Custom-product return policies vary. Several cited sellers describe made-to-order or custom beams as final sale, but that is a seller policy rather than a universal legal rule. Review the actual terms before release.
When the shipment arrives, inspect packaging and accessible surfaces promptly. Photograph visible damage and follow the seller’s and carrier’s stated reporting process. Do not assume that one company’s acceptance or claims procedure applies to another.
Before ordering, ask the supplier:
- What exactly does the quoted price purchase?
- Are dimensions nominal, ranged, or exact?
- What are the exterior dimensions and minimum interior clearances?
- Is the construction solid-board, veneer-faced, plywood-core, MDF, or another system?
- What moisture condition does the supplier state?
- What is the maximum one-piece section available for this product?
- Where will finger joints, lap joints, scarf joints, or field seams occur?
- How representative is the finish sample of species and texture variation?
- Does the beam arrive assembled or flat-packed?
- Are end caps included?
- Which blocking and installation instructions apply?
- When does lead time begin?
- Which freight, packaging, and delivery services are included?
- Who unloads the shipment?
- What is the seller’s damage-reporting procedure?
- Is the order final sale?
- What conditions are excluded from the warranty?
- Who is responsible for checking, movement, opened miters, finish variation, and installation damage?
A complete quote should itemize enough of these variables to make alternatives comparable. A low material price can cease to be economical after custom finishing, freight, unloading, difficult access, and field repair are added.
Frequently asked questions
Are box beams load-bearing?
Most decorative hollow wood box beams are not load-bearing. They are architectural shells selected for appearance, fit, concealment, and finish.
A box beam can wrap a structural LVL, glulam, steel beam, header, post, or column, but the concealed member remains responsible for the building load. The surrounding shell does not become structural merely because it encloses structural framing.
If the visible member must support a roof, floor, wall, fixture, or another load, refer to the structural drawings and obtain qualified review. Do not rely on decorative-beam dimensions or a generic installation guide.
What is the difference between two-, three-, and four-sided box beams?
A two-sided, L-shaped beam suits a corner where a wall or ceiling completes the enclosure. A three-sided, U-shaped beam is common on ceilings and walls because its open back fits over blocking or an existing member. A four-sided shell surrounds a post, column, or other element where every face remains visible.
The number of sides affects material, fabrication, installation sequence, cavity access, end treatment, and price. Confirm whether exposed ends need caps and whether a four-sided wrap must be assembled around an element already in place.
How much do custom box beams cost?
There is no dependable price without dimensions and specifications. Cost varies with species, exterior size, cavity size, length, side count, end caps, texture, finish, construction method, joints, packing, freight, hardware, equipment, installation labor, and touch-up.
Published prices may be starting figures or broad ranges and may not include customization or delivery. Request an itemized quote, identify the purchasing unit, and compare total installed cost rather than catalog amounts.
Can box beams cover long spans without a visible seam?
Sometimes, but the answer depends on available lumber, fabrication capability, beam construction, freight, building access, and safe handling. Manufacturers may offer long one-piece shells, finger-jointed material, lap joints, flat-packed assemblies, or multiple sections.
A one-piece beam can reduce visible seams while increasing shipping cost, damage exposure, unloading requirements, and installation difficulty. Where a joint is unavoidable, coordinate sightlines, lighting, intersections, grain continuity, and accessible blocking. Approve its location and finish treatment before production.
Can I install box beams myself, or should I hire a professional?
A capable DIY installer may be able to install a short, light, three-sided decorative beam on a flat ceiling when the framing is easy to verify and the manufacturer provides clear instructions. The work still requires accurate layout, overhead handling, cutting, blocking, dry fitting, attachment, and finish repair.
Professional installation is the more prudent choice for long or heavy sections, pitched or vaulted ceilings, irregular surfaces, complex joints, expensive factory finishes, uncertain framing, high work areas, or beams coordinating with services. Structural questions belong with an appropriate structural professional; electrical, plumbing, HVAC, and fire-protection conditions belong with the relevant trades.
Specify the project in the right order: determine whether the visible member is structural or decorative; select the side configuration and material; document exterior dimensions and usable cavity clearance; plan joints and service coordination; verify the attachment substrate; and obtain an itemized quote with samples, lead time, freight terms, and return restrictions. The safest and most economical correction is the one made on the drawing or shop order—not after a custom beam reaches the jobsite.